# Webflow: performance and SEO settings worth changing
> Webflow hosting gets the basics right. This guide covers the settings still your job: the SEO tab, page settings, images, fonts, interactions and redirects, and what a report can and cannot fix.
Updated 2026-09-25 · Other platforms · HTML version: https://getreport.app/guides/webflow-performance-and-seo-settings
Webflow hosting does more of the work than most platforms: a global CDN, HTTP/2, a certificate, minified files and responsive image variants come with the plan. What is left is a short list of settings that decide whether a Webflow site scores 60 or 90, and most of them live in two places: Site settings and the settings of each page. This guide goes through them in the order they matter, with the findings a report will show on a typical Webflow site and the realistic fix for each. Allow an hour, most of it for images.
## Quick answer
- **Site settings → SEO**: turn on the auto-generated sitemap, set the global canonical tag URL to your live domain, and switch on "Disable Webflow subdomain indexing" so the `.webflow.io` copy stays out of Google.
- **Every page**: a title and meta description in the page's SEO settings, an Open Graph image in its Open Graph settings; for CMS templates, bind those fields to the collection.
- **Images**: compress before upload, convert to WebP in the Assets panel, keep responsive variants on, and set the hero image's Load option to **Eager** (everything else stays lazy).
- **Fonts**: upload the two or three weights you use as custom fonts instead of loading a Google Fonts family, and preload the body font from the head code.
- **Interactions and Lottie**: every animation costs JavaScript on every page; keep them off the first screen.
- **Redirects**: add old paths in the 301 redirects list before you publish a restructure.
- Run the [speed test](https://getreport.app/tools/speed-test) and the SEO audit before and after. Server headers are set by Webflow; you cannot change them on standard plans.
## Why it matters
A Webflow site starts from a good place. The HTML is served from an edge near the visitor, the CSS and JavaScript are minified, and the connection is HTTPS from day one. That means the findings a report shows on a Webflow site are almost never about the server; they are about what was put into the site. A 3 MB hero exported straight from Figma, a Google Fonts family with eight weights, a page-load animation on the hero, a missing meta description on every CMS item: these are the differences between Webflow sites, and every one of them is a setting or an upload you control.
The SEO side has the same shape. Webflow generates the sitemap, the canonical tags and the hreflang tags for localised sites, but each of those is a toggle that someone has to switch on, and each page still needs its own title, description and preview image. The report tells you which ones were missed.
## How getReport checks it
> **Free tool:** [Website speed test](https://getreport.app/tools/speed-test): Lighthouse lab results and real-user Core Web Vitals for any page, mobile and desktop, with a filmstrip, a request waterfall and a fix for every slow part. Free, no signup.
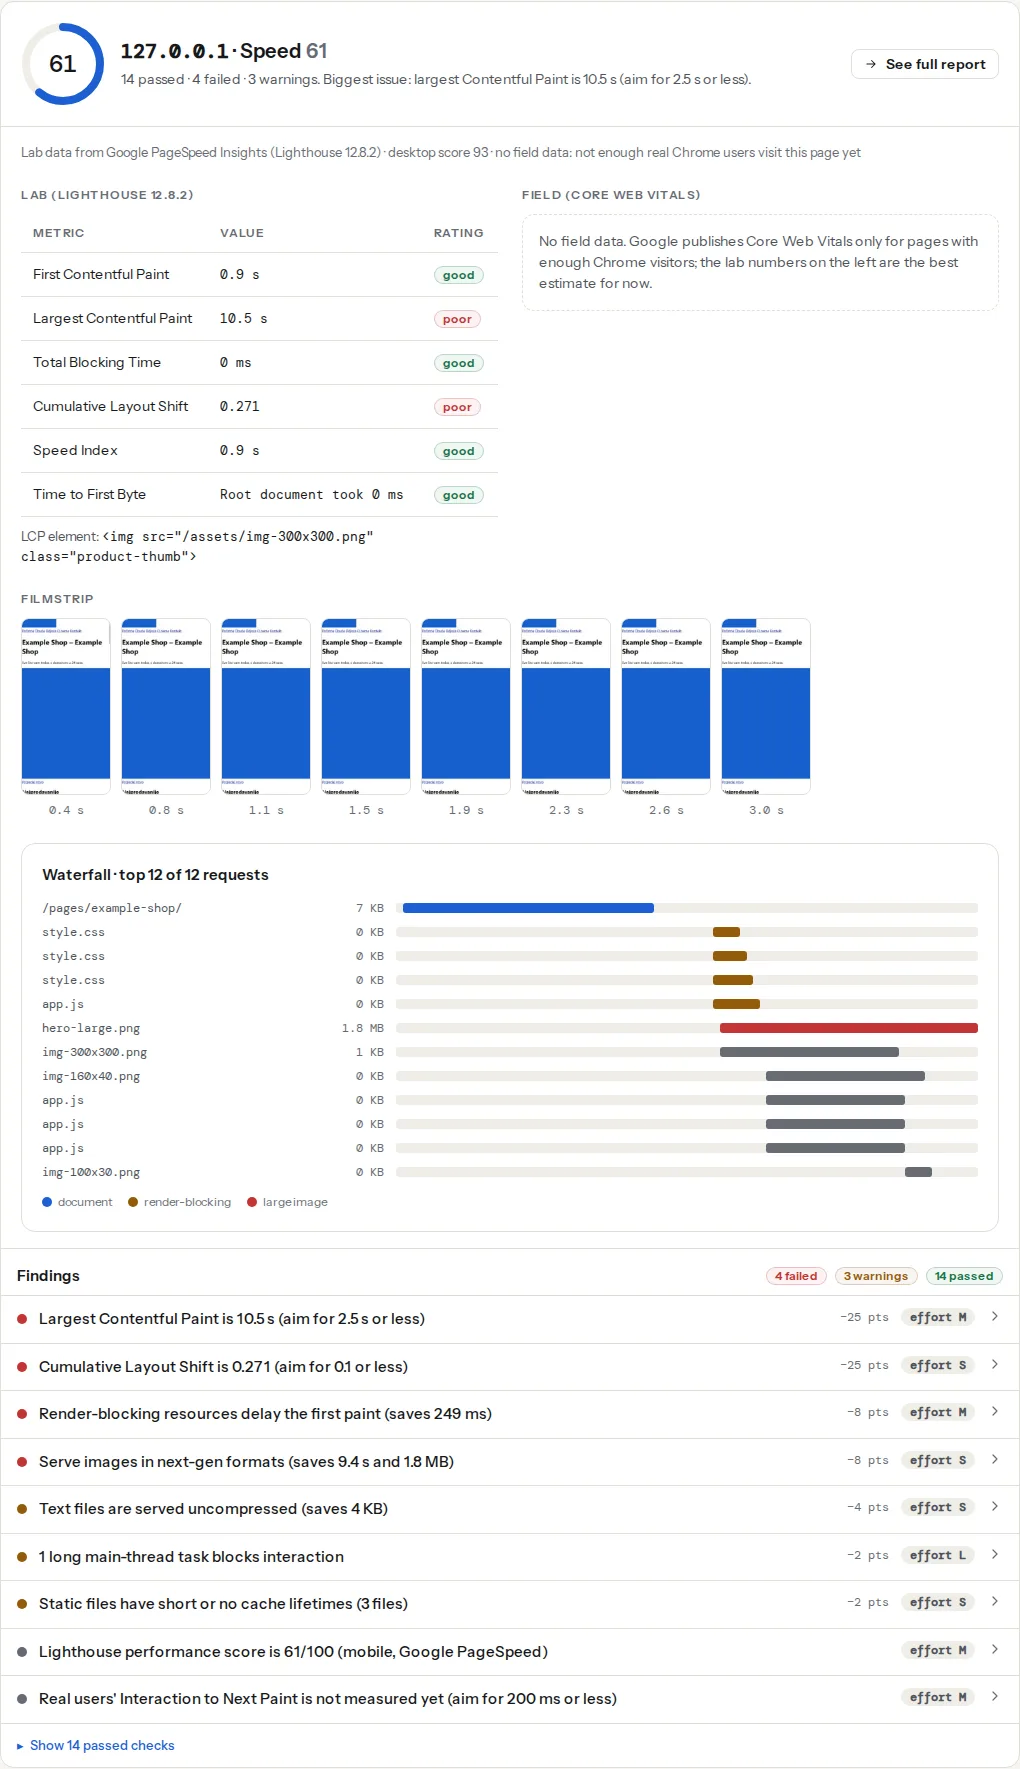
The speed test runs the full report and opens the Speed module. The panel shows the lab metrics from a Lighthouse run on a throttled phone, the field numbers from real Chrome users when the site has enough traffic, the filmstrip and the request waterfall:
The four findings that come up most on Webflow sites:
> **Check: Largest Contentful Paint.** LCP is when the biggest thing on screen — usually the hero image or headline — finishes loading. Visitors judge "is this site slow?" on it, and Google uses it for ranking.
>
> 1. Find the LCP element (named in your report) and make it lighter, earlier or both — a compressed WebP/AVIF, sized to the screen, without lazy loading.
> 2. Preload it with or add fetchpriority="high" on the .
> 3. Cut what comes before it — render-blocking CSS/JS and slow server responses push LCP back.
On Webflow the LCP element is nearly always the hero image or a background image in the first section. The technical detail names it, which tells you which asset to compress and which image element to set to Eager.
> **Check: Images are served in modern formats (WebP or AVIF).** WebP and AVIF are 25–50 % smaller than JPEG and PNG at the same quality. Smaller images load faster and cost visitors less data.
>
> 1. Convert images to WebP or AVIF and serve them with or content negotiation.
> 2. WordPress: enable WebP/AVIF in your image plugin or CDN (Imagify, ShortPixel, Cloudflare Polish); Shopify does this automatically for its CDN.
The check comes from Lighthouse and lists each image that would be smaller as WebP or AVIF. Webflow's Assets panel converts to WebP; the finding passes once the listed images are WebP.
> **Check: Canonical tag is present.** Without a canonical URL, search engines may index duplicate versions of this page (with and without trailing slash, with UTM parameters) and split its ranking signals.
>
> 1. Add in .
> 2. In WordPress, Yoast or Rank Math add this automatically — check it is not disabled for this page.
> **Check: robots.txt declares a sitemap.** A "Sitemap:" line in robots.txt is how crawlers find your XML sitemap without you registering it anywhere. Without it, new pages are discovered later.
>
> 1. Add a line to robots.txt: Sitemap: https://your-site.com/sitemap.xml (use the full URL).
The last two are the SEO tab. The canonical finding is open when the global canonical tag URL is empty; the sitemap finding looks for a `Sitemap:` line in `robots.txt`, which the robots.txt editor in the same tab lets you add.
## Step by step
### 1. Set the SEO tab once
Open Site settings → SEO. Four settings, top to bottom:
1. **Auto-generate sitemap**: on. Webflow then serves `/sitemap.xml` with every published static page and CMS item. Republish after changing it.
2. **robots.txt**: add the sitemap line so crawlers find it without Search Console:
```text
User-agent: *
Disallow:
Sitemap: https://www.example.com/sitemap.xml
```
Use the full URL with the scheme and the exact host you serve the site on.
3. **Global canonical tag URL**: your live domain with scheme, for example `https://www.example.com`. Webflow appends each page's path and adds `` to every page. Without it, the same page is reachable at the custom domain and at `name.webflow.io` and nothing tells Google which one counts.
4. **Disable Webflow subdomain indexing**: on. The `.webflow.io` copy is a full duplicate of the site; this keeps it out of search results.
Then check the Hosting tab (Publishing in newer workspaces): SSL on, and under Advanced publishing options, minify HTML, CSS and JS all on. These are usually on already; confirm rather than assume.
### 2. Give every page a title, description and preview image
Page settings → SEO settings holds the title tag and meta description; Open Graph settings holds the preview title, description and image. For static pages, write them by hand. For CMS collection templates, bind each field to a collection field (the small purple "+" beside the field): a "Meta title" and "Meta description" plain-text field and an image field for the preview. Add a fallback in the collection so items without a custom value still get one.
Titles of 50–60 characters and descriptions of 120–155 characters fit the result page; the SEO audit's title and description findings say when one is missing or too long. The Open Graph image should be 1200 × 630 px; the Social module previews it as Facebook, LinkedIn and X will show it.
### 3. Fix the hero image first
This is where most Webflow points are. In order:
1. **Resize before upload.** A full-width hero needs 1600–2000 px, not the 5000 px original. Export at the largest size it is displayed at.
2. **Convert to WebP** in the Assets panel: select the images and use the compress option. Webflow keeps the original and serves the WebP.
3. **Keep responsive variants on.** Webflow generates smaller versions of inline images and writes a `srcset` for them; the per-image "Responsive image" setting must stay on. Background images set in CSS do not get variants, so if the hero is a background image, make it an inline image element instead.
4. **Set the hero to Eager.** Webflow lazy-loads images by default. A lazy-loaded hero is discovered late and pushes LCP back; in the image element's settings, change Load from Lazy to Eager for the first image on the page only.
Do the same for the first image of each CMS template (the article image, the product photo). Everything below the first screen stays lazy.
The formats question in more depth is in [modern image formats: WebP, AVIF and when JPEG is still fine](https://getreport.app/guides/modern-image-formats-webp-avif).
### 4. Trim the fonts
Site settings → Fonts lists Google Fonts, Adobe Fonts and custom uploads. A Google Fonts family loads from Google's servers, which is an extra connection before text can render, and adding a family adds every weight you tick. The lighter route:
1. Download the family and keep the two or three weights you use (Regular, Semibold, maybe Italic) as WOFF2.
2. Upload them under Custom fonts. They are then served from the same CDN as the page, with no extra connection.
3. Preload the body font from Site settings → Custom code → Head code:
```html
```
Take the exact URL from the published page's CSS (view source, search for `@font-face`). Preload only the one or two fonts used above the fold; preloading eight files makes things worse. Which hint fits which case is in [preload, preconnect, prefetch: which hint when](https://getreport.app/guides/preload-preconnect-prefetch-which-hint-when).
### 5. Count the cost of interactions and Lottie
Webflow's interactions run from the site's JavaScript file, so every interaction on any page is downloaded on every page. That is fine for a hover state and expensive for a load animation on the hero: the animation delays the moment the biggest element is visible, which is exactly what LCP measures.
Lottie animations add a player library plus the animation's JSON file, which is often several hundred kilobytes. Rules that keep the score:
- No load animation on the hero section. Let it appear, animate the rest.
- Lottie below the first screen only, and export it small (fewer frames, simpler shapes).
- Delete interactions that are no longer used; they still ship.
The report's render-blocking, unused JavaScript and Total Blocking Time findings are where this shows up.
### 6. Add structured data in the head code
Webflow does not generate JSON-LD for you. Site-wide markup goes in Site settings → Custom code → Head code; page-specific markup in the page's own custom code. An Organization block for the whole site:
```html
```
For CMS templates, bind collection fields into the page custom code so each article or product carries its own block. Each custom code field has a 10,000-character limit, so keep it to what earns a rich result: Organization, Article or Product, BreadcrumbList. The Structured data module validates the result.
### 7. Set redirects before you restructure
Renaming a page or a collection slug changes URLs, and old links, Google's index and shared posts keep pointing at the old ones. Before publishing the change, add each old path in Site settings → Hosting (Publishing) → 301 redirects. Wildcards handle whole folders:
```text
/blog/(.*) → /articles/%1
/old-services → /services
```
Redirect to the final page in one hop; a redirect that lands on another redirect is what the SEO audit's redirect-chain finding reports.
### 8. Localised sites
With Webflow Localization, each locale gets its own subdirectory (`/fr/`, `/de/`) and Webflow writes the hreflang tags for every localised page. What is still yours: translated titles and descriptions per locale, and checking that each locale's pages are actually published. The [hreflang checker](https://getreport.app/tools/hreflang-checker) confirms the pairs point back at each other.
## Platform notes
### What the report will flag that you cannot change
- **Security headers.** Webflow sets the response headers; standard plans cannot add a Content-Security-Policy or change what is there. Custom HTTP headers are an Enterprise feature. Note these findings as "platform" and move on; the connection is HTTPS and that is what matters most.
- **Unused CSS.** Webflow ships one stylesheet for the whole site, so every page downloads rules for every other page. Deleting unused classes in the Style Manager (the "clean up" option) shrinks it, but the finding rarely closes completely.
- **Server response time.** The edge cache answers fast; if TTFB is high in the lab, re-run once, as the first request after a publish is a cache miss.
### Exporting the code
Sites exported to another host lose the CMS but keep the CSS and JavaScript. The image variants and the WebP files come with the export; the redirects and the sitemap do not, so set those up again on the new host.
## Verify
- The speed test shows LCP under 2.5 s on mobile and the technical detail names your compressed WebP hero; the image-formats finding passes.
- The [SEO audit](https://getreport.app/tools/seo-audit) shows "Canonical tag is present" pointing at your live domain, "robots.txt declares a sitemap", and every tested page with a title and description.
- `https://www.example.com/sitemap.xml` opens and lists the pages you expect; `https://name.webflow.io/` carries `noindex`.
- The Social module preview shows the right image for a CMS item, not the site default.
## Common mistakes
- **Global canonical URL left empty after connecting the domain.** Both the custom domain and the `.webflow.io` copy are indexable duplicates. Fill in the field and republish.
- **Hero image left on Lazy.** The default is right for every image except the first one. Set that one to Eager.
- **Uploading originals and relying on responsive variants.** Variants scale the width, not the compression. A 4 MB original still produces a heavy largest variant; compress before upload.
- **A Google Fonts family with every weight ticked.** Each weight is a file. Upload the three you use as custom fonts.
- **Load animations on the hero.** They delay LCP on the most-visited section of the site. Animate the second section instead.
- **Publishing a slug change without redirects.** Add the old path to the 301 list first, then publish. Check it with the [redirect checker](https://getreport.app/tools/redirect-checker).